|
||
 |
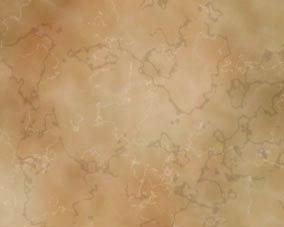
Create a new image - any size, 72 dpi, RGB mode. Name the lowermost layer 'base color'. Fill it with the color you want your marble to be. I chose a pale rust (137 R, 79 G, 64 B) for this example. | |
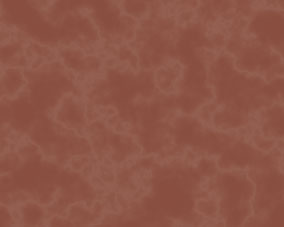 |
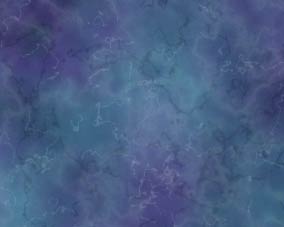
This
texture uses Eye Candy. If you do not have it, see text below.* 1. Make a new layer named 'deep veins' 2. Run "marble". Vein size: .53 Vein coverage: 97 Thickness: 1 Roughness: 62 Bedrock color: White Vein color: Black Seamless Tile: checked Random Seed: 10 3. inverse image 4. set layer mode to screen: 9% 5. Levels: input levels - black: 0 gamma: 1.75 white: 237 *you can mimick the texture of the marble filter by rendering clouds (B/W) and running difference clouds - maybe 15 or more times - until you get what looks like lightning crackles. Run "trace contour" or "find edges" and a small "gaussian blur" until you get the effect pictured. |
|
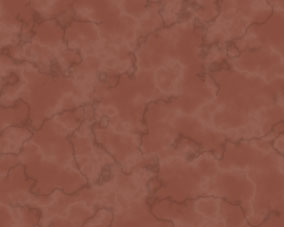 |
1.
Create a new layer named 'dark veins' 2. Run "marble". Vein size: .61 Vein coverage: 97 Thickness: 1 Roughness: 48 Bedrock color: White Vein color: Black Seamless Tile: checked Random Seed: 4 3. duplicate 'deep veins' layer and name copy 'light veins'. Click on 'deep veins' layer 4. set layer mode to multiply: 12% 5. Levels: input levels - black: 19 gamma: 1.00 white: 70 |
|
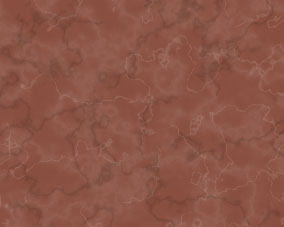 |
1.
Click on 'light veins' layer and inverse the colors. 2. set layer mode to screen: 10% 3. Levels: input levels - black: 98 gamma: 1.67 white: 223 4. flip layer horizontally and vertically 5. Gaussian blurr: .2% |
|
 |
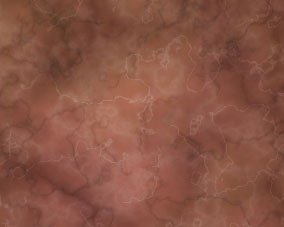
1.
Create a new layer named 'depth pattern'. Set opacity: 32%, mode:
overlay. 2. Set colors to default (type the letter 'd'). 3. Run clouds filter 4. Run difference clouds 2 times - more for a rougher look. 5. Levels; click auto levels button, set gamma to 1.4, output levels to 17 and 255. |
|
 |
1.
Create a new layer named 'color variance'. Set mode to color: 20%.
2. Sample base color. Click foreground color swatch and move hue slider to a slightly warmer hue (144 R, 112 G, 57 B). 3. Hold down option key and sample base color. Click background color swatch and move hue slider to a slightly cooler hue (144 R, 57 G, 104 B). 4. Run clouds filter, then difference clouds 5 or 6 times until you get a color effect you like. 5. Hue/Saturation: change Hue: +25, saturation: -79, lightness: +6 |
|
 |
Layers
should be stacked like this. See other color variations below. |
|
 |
 |
|
All images copyright 1991-2006 Deborah Richardson. All rights reserved. Unauthorized use or reproduction prohibited.